

How To Create A Checkout Page In Wordpress
Between setting up your online store, figuring out the most effective way to showcase your products, and running marketing campaigns, store owners sometimes overlook learning how to customize the WooCommerce checkout page.
Aside from delivering an overall better user experience, here are a few reasons why you'd want to customize the WooCommerce checkout:
- In order to make it easier (and faster) for your customers to make a purchase,
- To increase their trust with your e-commerce store, and
- To encourage customers to buy more from you.
With this in mind, in this post, we'll go over some of the different ways you can customize the WooCommerce checkout page. We'll show you how to add extra checkout fields, and how to create a one-page checkout with a searchable product table at the top.
Before we begin, let's quickly step through some reasons why you should customize the WooCommerce checkout page and how it can benefit your business.
Why you should customize the WooCommerce checkout page
As an online store owner, your goal is to deliver a seamless shopping experience to your customers. One way to achieve this is by creating a frictionless checkout process.
Here are some of the key benefits of learning how to customize the WooCommerce checkout page:
Make it easier for customers to make purchases (increase conversion rate)
You can customize the WooCommerce checkout page to make it easier for your customers to make purchases. If people have to click through multiple pages to buy products, they'll likely end up abandoning their shopping cart in favor of another store.
However, by speeding up the order process, you can move the customer through the purchase journey faster, increase conversions, and potentially boost sales.
Encourage customers to buy more
Customizing your WooCommerce checkout page includes letting your customers easily add multiple products to their shopping cart at once. It also involves making it easier for them to choose product variants without having to click through to the single product page.
This way, they'll be more likely to buy more of your products, enabling you to increase your average order value.
Provide a secure checkout experience
As an online store owner, you probably already know that a secure checkout is one of the most important factors in delivering a great shopping experience. You want to be able to let customers know that their contact and billing information is safe. One way to achieve this is by offering a secure (and popular) payment gateway at checkout.
Now that we know the benefits of learning how to customize the WooCommerce checkout page, let's look at some of the ways you can implement it in your own WooCommerce-based WordPress site.
Simplifying the WooCommerce checkout to improve the checkout experience
By making it easier for customers to select products, place orders, and complete their transaction, you can improve your conversion rate and increase sales.
Add custom fields to the checkout
With WooCommerce, out of the box it's not possible to add or remove form fields from the checkout form. There's no option available to do this using a drag and drop form editor or point and click options.
This can be a huge limitation for some online store owners.
For example, if you're selling digital goods (like e-books, PSDs, or other downloadable resources), you don't need to collect some customer details, like shipping information. In fact, if you leave the field in, customers might be confused as to why you're asking for their address for a digital product!
On the flip side, you might need to customize the WooCommerce checkout page to add an extra field or two. For example, if you're selling customized jewelry and watches, you'd need an add-on custom field to let customers enter the words or phrase they'd like to have engraved. If you're taking restaurant food orders, then you might want a checkout field for the customer to enter special dietary information.
Divide the checkout form into multiple steps
Depending on the types of products you sell, you might consider dividing your checkout form into multiple steps. Multi-step checkout forms make it easier for customers to complete the checkout form for two main reasons:
- They group similar fields together making the form look shorter.
- Customers are less likely to miss a field or make errors which minimizes potential frustration.
This is a great way to simplify the checkout process and deliver a frictionless shopping experience.
Create a one page checkout with a searchable product table
 One of the easiest (and most effective) ways to simplify checkout is by allowing customers to select products and variations, add them to cart, and checkout from the same page. Essentially, it optimizes the order process and speeds up the buyer's journey.
Of course, the number of clicks is a major factor here. If customers have to click through several pages to add products to their cart and place their order, the likeliness of them completing the transaction drops significantly.
By listing your products on the same page as the WooCommerce checkout, you can speed up the customer journey. This will not only improve the customer's shopping experience but also increase your sales and improve conversions.
Next, I'll tell you how to make all these customizations to the WooCommerce checkout.
How to add custom new fields to the WooCommerce checkout page
The WooCommerce Checkout Field Editor checkout manager plugin lets you easily customize the form fields and additional options (such as placeholders) on your WooCommerce checkout page. You can both add additional fields and remove fields to set up your own custom checkout fields.
Once you install and activate the plugin, you'll be able to add, move, edit, or remove any field from your WooCommerce checkout form. It lets you modify the WooCommerce checkout fields including its type, position, label, placeholder, and much more.
To do this, simply head over to WooCommerce → Checkout Fields to add new fields or start editing.

From here, you'll be able to edit three different sets of WooCommerce checkout fields:
- This includes the payment fields and billing fields sections of the checkout form.
- If you have shipping enabled, you'll be able to edit the shipping fields (such as shipping address fields).
- These are the fields that appear on your checkout form after the billing and shipping sections (such as order notes or other order details).
In addition to this, you can add different types of custom fields to your checkout form including:
- Text field, password field, and text area input fields
- Select and multiselect options
- Radio buttons and checkboxes
- Date picker fields
You can also specify the field name and labels.
How to create a one page checkout with customizable product table
With WooCommerce, you have two main options when it comes to creating a one page checkout:
Option 1: For listing a handful of products
With the official WooCommerce One Page Checkout plugin, you can create a single page checkout for your online store without requiring any code tweaks.
In addition to this, it lets you position the checkout form directly under your product tables in the cart page. If you're looking for a way to let customers modify product quantities from the checkout form then we'd recommend using this great plugin to create a one page checkout.
This extension comes with several product layout options that allow you to list products above the checkout form. However, these options are limited. For example, it doesn't allow you to showcase dozens of products, add filters, or even a search box to the product listing section. So, while this is certainly a great option for listing a few products, you'll need a different solution if you'd like to showcase more products at the one page checkout.
Option 2: For listing dozens of products
The official One Page Checkout plugin is only really suitable for listing a few products on the checkout page. If you want to list dozens of WooCommerce products on the checkout page, we recommend using the WooCommerce One Page Checkout plugin with WooCommerce Product Table.
WooCommerce Product Table
An easy-to-use plugin for customizing your WooCommerce checkout page.
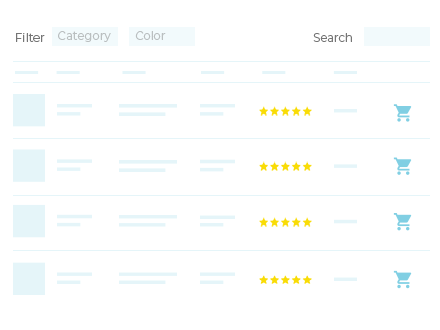
WooCommerce Product Table allows you to list your products in a much more sophisticated way. More specifically, you'll be able to:
- Add search, sort, and filter options to make it easy for customers to find exactly what they're looking for.
- Display product variation dropdown menus directly in the product table.
- Choose which columns you want to show and hide.
- Make it easy for customers to add multiple products to cart in one go.
All of these options will be integrated directly in the one page checkout form.
To get started, you'll need a WordPress website with the WooCommerce plugin installed and a few products added to it. Once you have everything in place, here are the steps you need to follow to add a one page checkout page to your WooCommerce site:
Step #1: Install and activate WooCommerce Product Table
Get the WooCommerce Product Table plugin and install it on your website. Once that's done, head over to WooCommerce → Settings → Products → Product Tables and enter your license key.
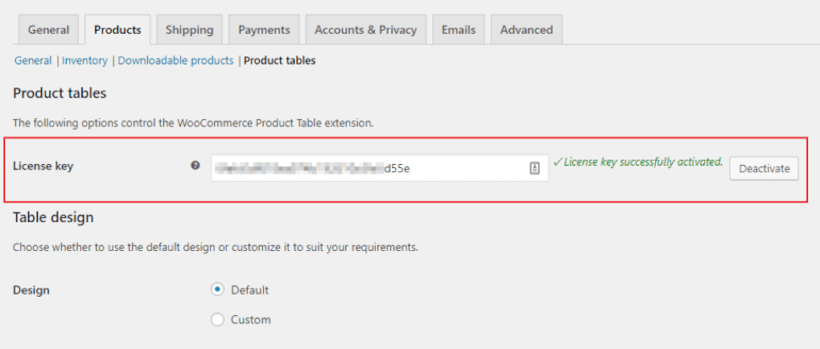
Click the Save Changes button at the bottom of the screen to proceed.
Step #2: Configure the WooCommerce Product Table settings
From the same screen, you'll be able to set up your product table any way you want. Here are a few quick tips to help you create an enhanced WooCommerce one page shopping experience for customers:
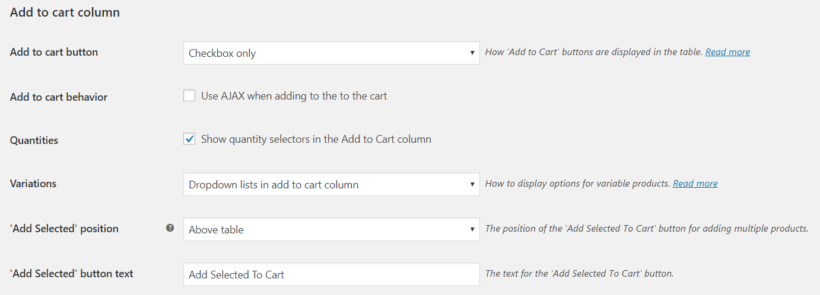
- Leave the AJAX cart checkbox for the Add to cart behavior option unticked. This way, whenever customers add products to the shopping cart, the page will reload showing the one page checkout below with the correct products.
- Make sure that the Quantities option is ticked to allow customers to purchase more than one product (or variation) at a time.
- Set the Add to cart button option to Checkbox only or Button and checkbox in order to allow customers to add multiple products to cart at once. This adds a clear multi-select option which enables customers to add many products to cart at the same time.
- Set the Variations option to either Dropdown lists in add to cart column or Separate rows in table (one per variation) if you want to showcase variable products in the product table. This allows customers to choose product variations from within the order form instead of clicking through to the single product page.
Additionally, you can prevent customers from leaving the one page order form by clicking through to the single product page. To do this, you'll need to enter none for the Product links option. Doing so will disable all links to single product pages.

Finally, we recommend keeping the number of Rows per page as low as possible to enable customers to easily see the checkout form under the product table without having to scroll for too long.

If the number of products is greater than the number of rows, page links (pagination) will be displayed under the table allows customers to view more products.
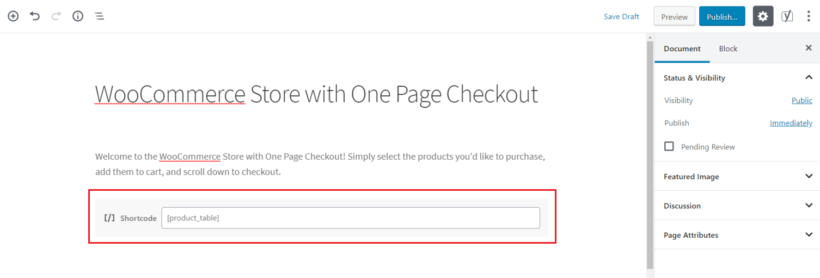
Step #3: Create the checkout page
Now that we've configured the WooCommerce Product Table plugin, all that's left to do is create the page you'd like to add the WooCommerce product list and one page checkout to. To begin, head over to Pages > Add New and create a new page.
Here's what you need to do:
Add a few instructions on the top of the page for customers. For instance, this could be a friendly line that tells them to pick their products, add them to the shopping cart, and scroll down the page to checkout.
Next, add the WooCommerce Product Table shortcode to the page i.e.[product_table]. You can add this to the Shortcode block if you're using the Gutenberg editor or directly to the text editor in case you're using the classic WordPress editor.
This way, all your products will be listed in the product table.
You can configure the WooCommerce Product Table options to customize the table. Be sure to check out the plugin's documentation for in-depth instructions.
Finally, you'll need to add a shortcode below the product table shortcode(s) in order to display the checkout form. You can do this by creating a new shortcode block and adding [woocommerce_one_page_checkout] to it.
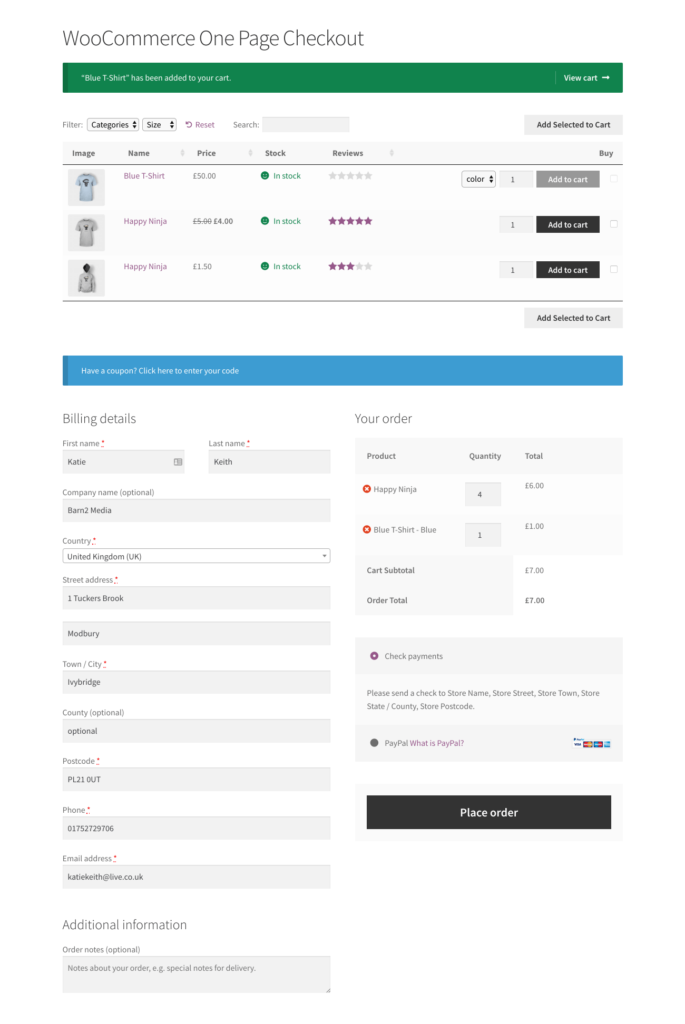
When you're done, your WooCommerce order form page will look something like below on your site's front-end. Customers can choose items at the top. Then, they'll get an order review and checkout form below, where they can enter their customer details and choose payment methods.
Here's a screenshot of how it might look:
How to manually customize the WooCommerce checkout page with code
If you're a developer who knows your way around PHP files and JavaScript, you can also manually edit your checkout template using custom code.
To insert additional content into your checkout template, you can edit the functions.php file for your store's child theme and use WooCommerce's built-in checkout hooks.
By default, WooCommerce offers 9 action hooks on your checkout page:
- woocommerce_before_checkout_form
- woocommerce_checkout_before_customer_details
- woocommerce_checkout_billing
- woocommerce_checkout_shipping
- woocommerce_checkout_after_customer_details
- woocommerce_checkout_before_order_review
- woocommerce_checkout_order_review
- woocommerce_checkout_after_order_review
- woocommerce_after_checkout_form
You can use these hooks to insert your own content or fields.
For example, to insert content or display fields before the customer details fields, you could use this code snippet:
add_action( 'woocommerce_checkout_before_customer_details', function() {
              echo '<p>Content you want to display before customer details fields</p>';
              });
To simplify managing these code snippets, you can use a free plugin like Code Snippets rather than adding them directly to your functions.php file.
Conclusion
Out of the box, WooCommerce doesn't offer the best possible shopping experience. Depending on the types of products you're selling, you might consider learning how to customize the WooCommerce checkout page to:
- Make it easy for customers to easily choose the products they want to purchase.
- Quickly find the products they're looking for and add multiple products to cart in one go.
- Select products and variations, add products to cart, and checkout from a single page.
- Display extra fields or hide irrelevant fields to improve conversions.
With plugins like Checkout Field Editor, WooCommerce One Page Checkout, and WooCommerce Product Table, you can customize the WooCommerce checkout page in no time! And, as a result, you'll be able to increase your sales and boost conversions.
WooCommerce Product Table
An easy-to-use plugin for customizing your WooCommerce checkout page.
What are some of the strategies you use to deliver a better online shopping experience to customers? Do you have any other questions about how to customize the WooCommerce checkout page? We'd love to hear from you so let us know by commenting below!
How To Create A Checkout Page In Wordpress
Source: https://barn2.com/woocommerce-checkout-page/
Posted by: hubbardwhationam.blogspot.com
0 Response to "How To Create A Checkout Page In Wordpress"
Post a Comment